Tips for Maintaining Scuba Cylinder Health
Out of all your scuba diving equipment, your scuba cylinder is the unsung hero of it all. We have a tendency to focus on the quality and maintenance of the wetsuits, BCDs and regulators of wherever we go diving, but not on the most important feature of your scuba equipment, and your lifeline.
Out of all your scuba diving equipment, your scuba cylinder is the unsung hero of it all. We have a tendency to focus on the quality and maintenance of the wetsuits, BCDs and regulators of wherever we go diving, but not on the most important feature of your scuba equipment, and your lifeline.
Scuba cylinders are filled with filtered, compressed air. The air is taken through the air intake of the compressor and passes through a filtration system, where particles and moisture are filtered out of it. However, even with the proper filtration systems, scuba cylinders still need to be inspected once in a while to ensure that they are in proper working order. The two inspection requirements are the visual inspection and hydrostatic test.
1. Visual inspection
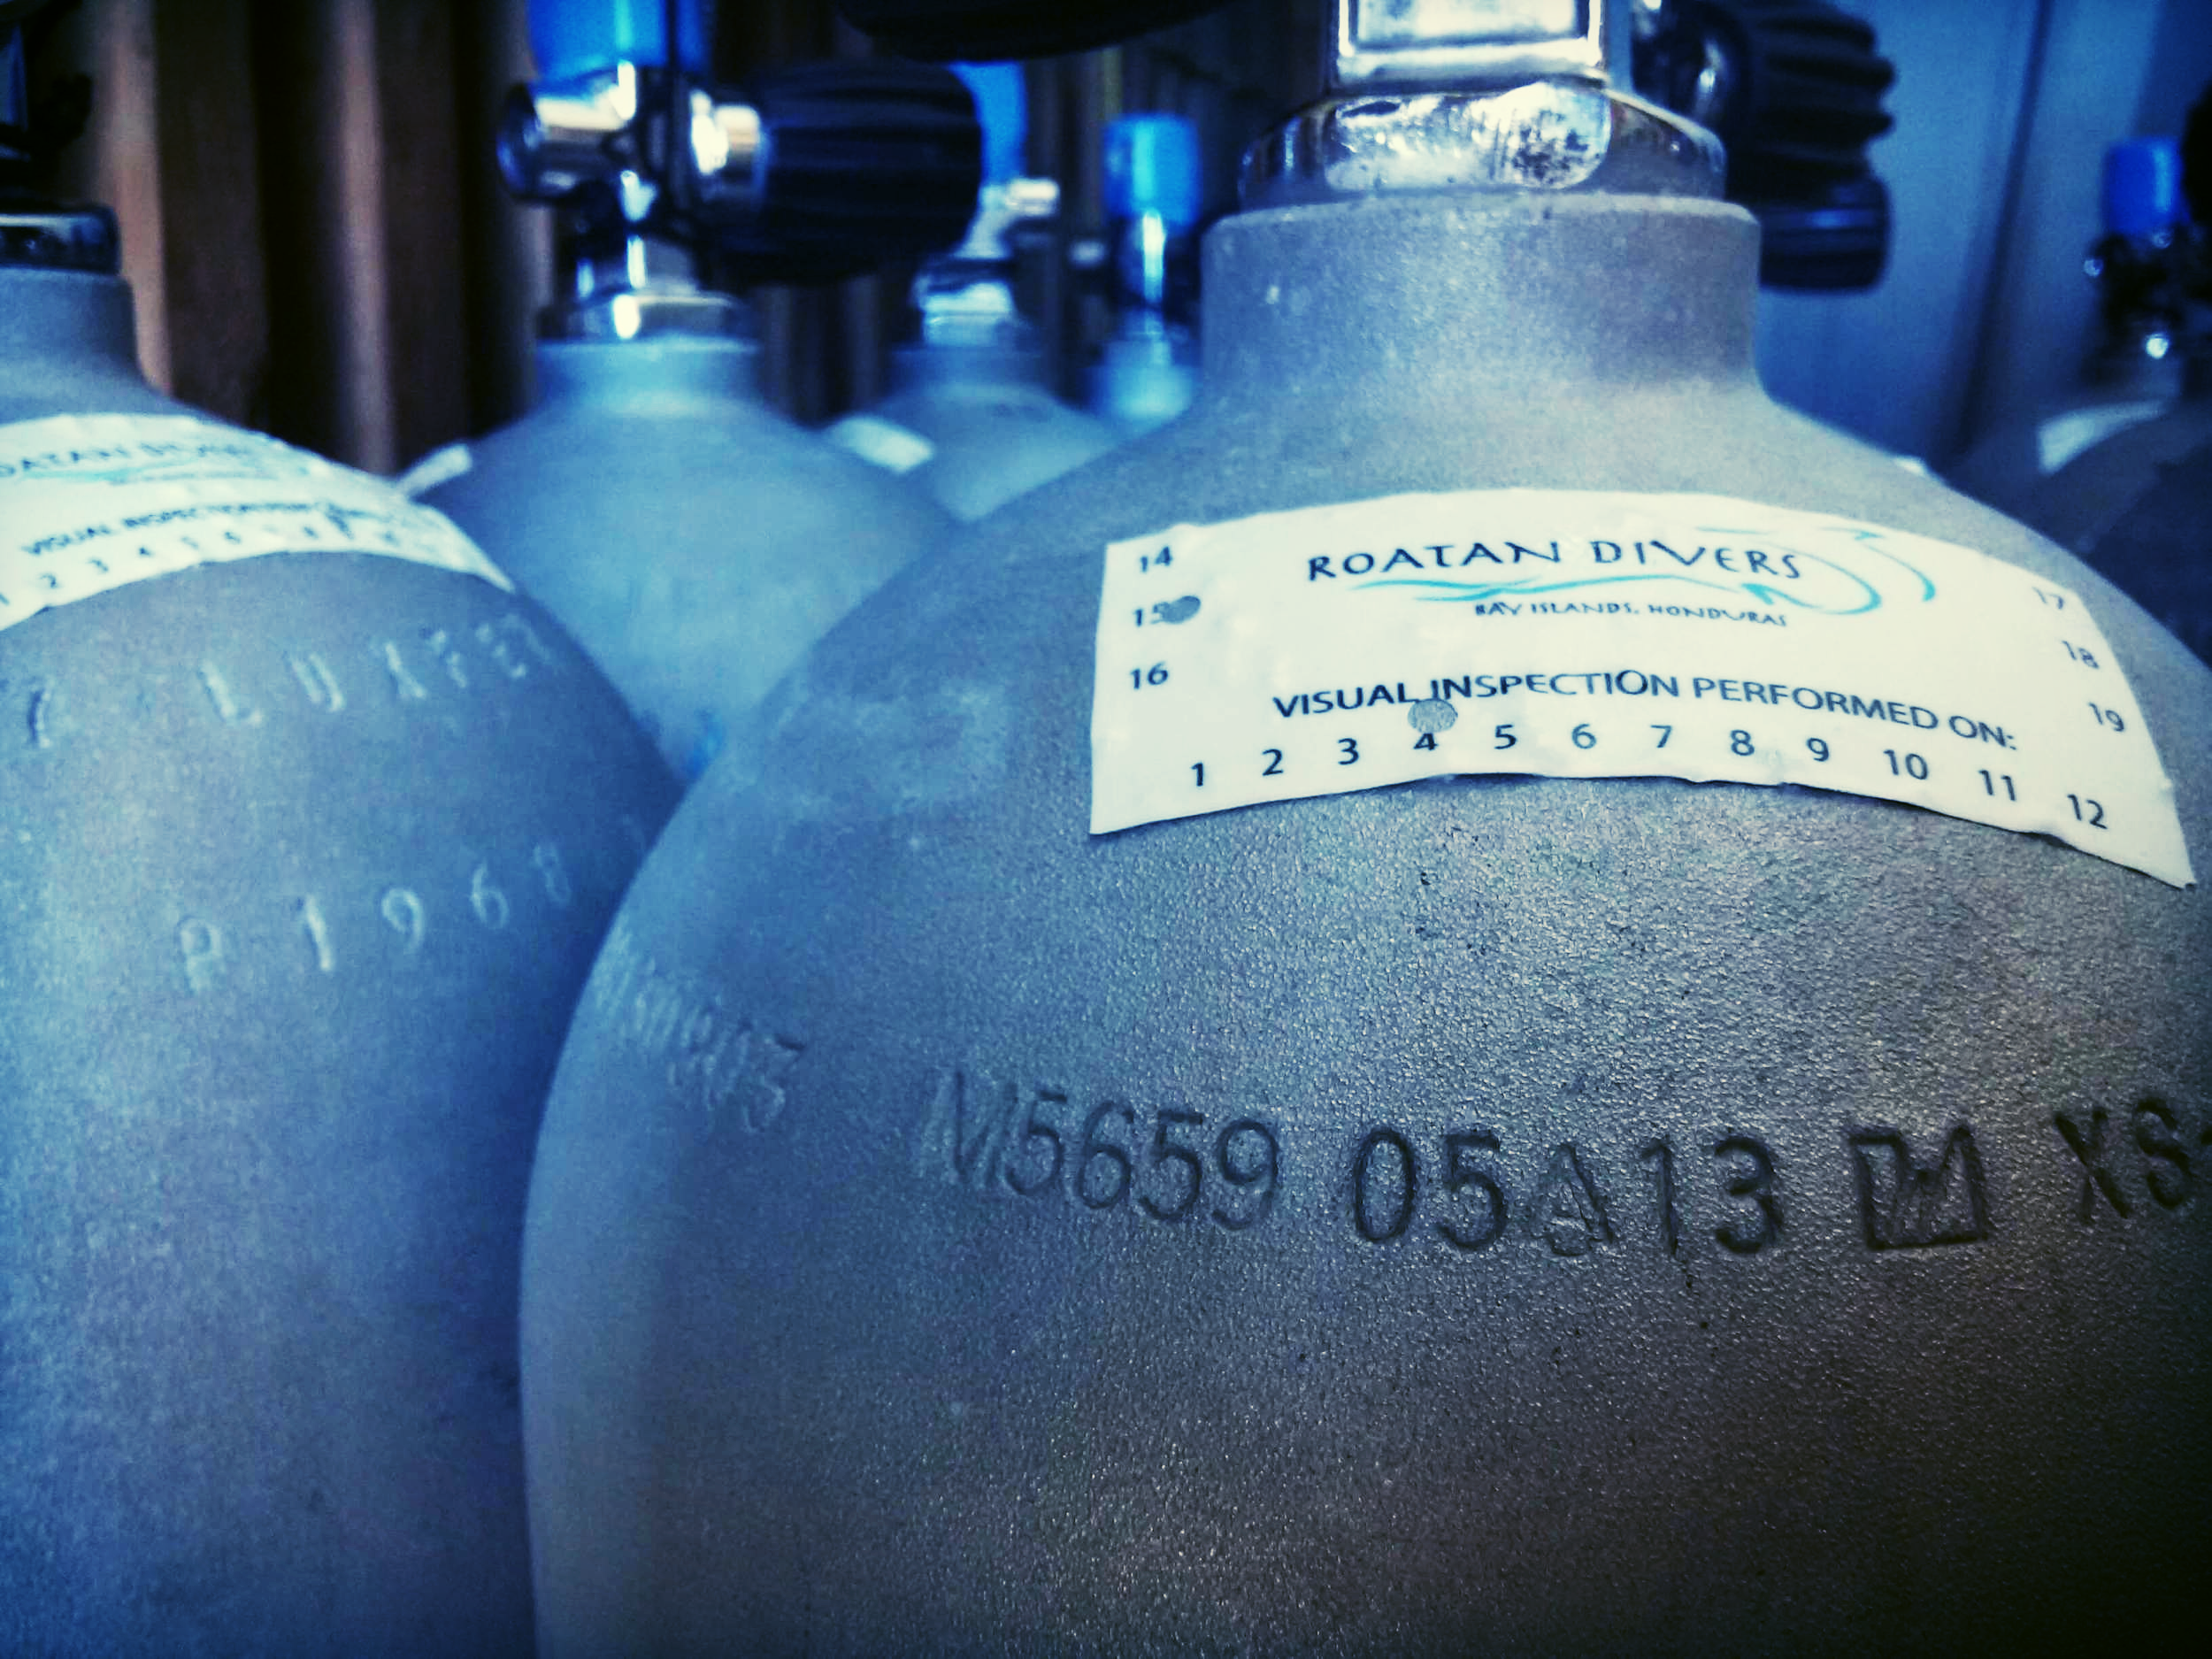
Scuba cylinders should be visually inspected once a year by a qualified visual cylinder inspector. In a visual inspection, we empty the tank, take the valve off the top of the cylinder and take a look inside for corrosion, aluminum alloy build-up and moisture. Whenever you dive somewhere, make sure to check for the visual inspection sticker. If it's not there, ask the dive center when their last visual inspection was.

Always check visual inspections before you dive
2. Hydrostatic testing
Scuba cylinders should normally be tested every two to five years, based on local laws and regulations. In a hydrostatic test, the cylinder is normally filled to 5/3 of its normal fill capacity, and then cylinder walls' flex is tested. Hydrostatic testing is imperative to maintaining the integrity of tanks, and therefore imperative to maintaining your safety. Scuba cylinders will have the last date of hydrostatic testing embedded into them. Most local laws and regulations will not exceed five years for hydrostatic testing requirements, so if the last date of testing was over five years ago, make sure to ask about it.
This tank was hydrostatically tested in May 2013
Here are some tips to help maintain your scuba cylinders:
1. Don't ever empty a tank completely.
Pressure inside the tank prevents water from entering it. Make sure never to empty your tank too quickly either, as that can cause condensation to build up on the inside and outside.
2. Have your tanks filled only by reputable scuba air stations
If a guy is filling scuba tanks out of the back of his van, the air probably isn't going to be super clean. Remember, even minute percentages of contamination, such as carbon monoxide, will be greater under pressure, so you want to make sure your air is clean to prevent such issues.
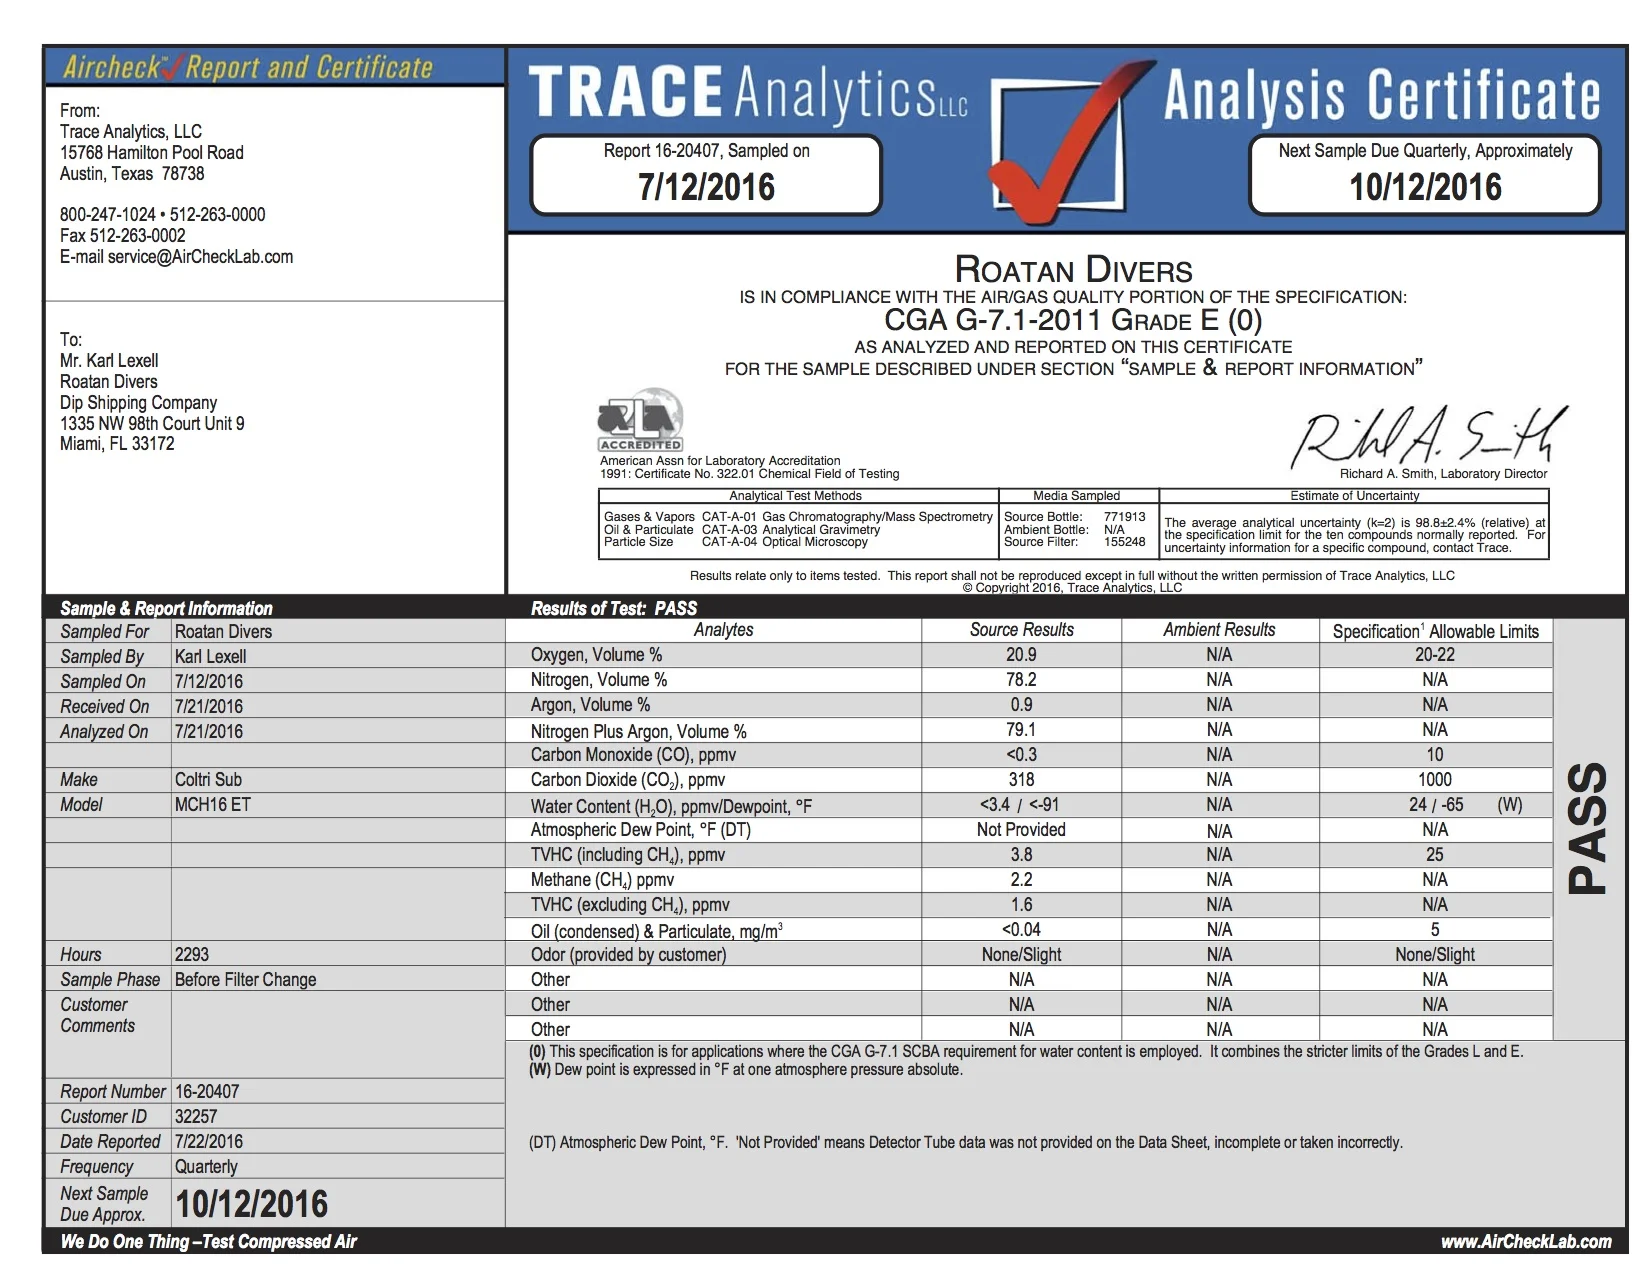
An analysis certificate from Trace Analytics, based on a quarterly air sample
Air stations should get their air tested, preferably quarterly. We use Trace Analytics, an independent testing lab in Texas. We send them air samples every three months, and they send back the results to let us know if the air passes. Air testing is a great way of also checking on the compressor's health, because if the air doesn't pass, it's a sign that there may be something wrong with the compressor as well.
3. Store your cylinders in a cool, dry place
Extreme heat is the death of scuba cylinders, so avoid putting them under extra pressure and keep them out of the sun. Also make sure to keep them standing in a cool, dry place where they can't get knocked over.
Our scuba cylinders are such an important part of our scuba equipment, so make sure not to neglect them! Remember, maintenance is key when it comes to anything, so keep all of your scuba gear well-maintained and serviced and you will get many years of diving with them.
Happy diving!
5 Ways to Weight Yourself Perfectly for Scuba Diving
One of the first questions we ask all of our divers when they checked in is, "How many weights do you need?". It's so important to keep track of your weighting to make each dive, wherever you go, as easy and relaxing as possible.
One of the first questions we ask all of our divers when they checked in is, "How many weights do you need?". It's so important to keep track of your weighting to make each dive, wherever you go, as easy and relaxing as possible. Being severely underweighted or overweighted on your dives can be incredibly stressful, especially if you are not an experienced diver. Your dive center can try to help you out by estimating the weights you need, but especially with everyone's different body compositions, they aren't always going to be able to accurately predict what you need.
Here are some tips to help you weight yourself accurately every time.
Tip 1. Keep records
Every time you dive, make sure to note your exposure suit type and the weights you used. That way, the next time you dive somewhere, you can just look through your logbook, find the corresponding exposure suit to match what you'll be wearing this time, and weight yourself accordingly.
As a note, BCD and fin types can also affect buoyancy, so if your equipment drastically changes between dive trips, take that into account as well. Always perform a buoyancy check on your first dive in a new place.
Tip 2. Be aware each time you are weighted
We get a lot of people telling us "I used four (or any other number) weights last time". Four 2-pounders? Four 3-pounders? Four 4-pounders? Don't count on just knowing the number of weights you had, make sure to keep in mind how much each weight weighed as well. It's your responsibility to be aware of your weighting needs, so even if your dive center sets everything up for you, you need to keep track yourself.
Tip 3. Focus on your breathing techniques
You could be perfectly weighted, but if you don't breathe properly, your buoyancy could be off anyways. If you tend to keep air in your lungs, learn how to empty them completely. Breathe in and out big, deep breaths, and never hold your breath. Your lungs act as an additional buoyancy control device, and holding your breathe will only add to your buoyancy. Good breathing will greatly improve your buoyancy control and your diving.
Tip 4. Learn what weight distribution works for you
There are different ways to weight yourself. Some people prefer weight belts, some prefer integrated weights, some like to use a combination of both. Everyone is different in their preferences and in what works best for their diving. Figure out which method you prefer, as well as the distribution you prefer, and stick to what works best for you.
It is important, however, to be flexible. If you're relying on rental gear, you kind of have to use what they have available. A lot of dive centers don't have integrated weight pockets in their rental gear, so if integrated is something you must, must use, consider purchasing your own BCD to avoid problems.
Tip 5. Take a buoyancy control course
Whenever we have a PADI Advanced Open Water Diver course starting, one Adventure Dive that we always encourage is the Peak Performance Buoyancy dive. It's a great opportunity to really figure out how much weight you need, you learn what it feels like to be both over- and underweighted in a controlled environment, and we have little obstacle courses and games to help you focus on your breathing and buoyancy. The PPB dive, and corresponding specialty, can improve your diving in so many ways, so it's a continuing education option that you should definitely consider.
Bonus tip. Practice makes perfect!
Every time you dive, take the time to focus on all aspects of your diving techniques. Think about your breathing, your kicking, your weight distribution - think about all of it every time you dive. As a certified diver, you should know these things. Don't rely on the dive center to be able to figure it out for you. It's your responsibility, both to yourself, to your buddy and to your dive center, to be the best, most self-aware diver you can be.
Happy diving!
What makes up a PADI Open Water Diver Course?
You have decided that you want to embark on a scuba certification course. Congratulations, you've come to the right place! We get a lot of questions regarding what makes up a PADI Open Water Diver course, so we thought we would lay it all out to give you a better idea of what to expect.
You have decided that you want to embark on a scuba certification course. Congratulations, you've come to the right place! We get a lot of questions regarding what makes up a PADI Open Water Diver course, so we thought we would lay it all out to give you a better idea of what to expect.
There are four components to the PADI Open Water Diver course: theory, confined water work, waterskills asessement, and open water dives.
The PADI Open Water Diver course normally takes 3-5 days to complete. This course certifies you to dive to a maximum depth of 18 m/60 feet.
As with all PADI courses, our PADI Open Water Diver course is performance based and not time based, meaning we will spend the time needed to make sure you will be a competent, safe diver at the end of the course.
We like to create variety in each day, so each day we will combine classroom work, confined water work, and open water dives. Most days will start at 9AM, but it all depends on performance. We have a general schedule that we like to follow, but we personalize each course to match our students' strengths and needs.

Theory
There are five chapters in the PADI Open Water Diver manual, with five Knowledge Reviews (one per chapter), four quizzes and one final exam. You will watch the PADI Open Water Diver video during your course, which works in conjunction with the PADI Open Water Diver manual. Everything in the PADI Open Water Diver course is about reinforcement - the video reinforces the knowledge you learn in the manual, which is reinforced by the Knowledge Reviews, which is reinforced by the quizzes, which is reinforced by the final exam. We like to spread the theory out so that your in-water work will then reinforce everything you learn in theory.
If you'd prefer to do your theory work prior to arrival so that you can get in the water right away, PADI has you covered! You can do your theory online through PADI e-Learning or offline through PADI Touch. Both options are a great way to get the most out of your time on Roatan and get diving!
Sign up for PADI eLearning now!
Confined Water Dives
After learning and practicing how to set up your scuba equipment, you will go into shallow water for your confined water dives. The majority of your skills practice will focus on hand signals, mask, regulator and buoyancy skills, but we will also practice different emergency skills, such as out of air, Controlled Emergency Swimming Ascent (CESA), breathing from a free flowing regulators and removing and replacing your gear underwater and on the surface. We work with you until you can complete the skills comfortably. Some of these skills you will continue practicing on your open water dives, while some of them will just be done in confined water.
Waterskills Assessment
One of the requirements of your PADI Open Water Diver course is waterskills assessment, where you show that you can swim, float and complete skin diving. You will complete a 200 meter swim and a 10 minute survival float early in your course, as well as practice skin diving skills.
Open Water Dives
The best part! You will complete four open water dives during your course. On each dive, you will have some skills to complete, like mask clearing, regulator recovery, and different buoyancy procedures. All of these skills you would have practiced in your confined water dives, so it's just a refresher of the skills you already practiced. The majority of the dive is just spent diving, since practicing diving is just as important as practicing skills.
Does this all sound good to you? For more information or to sign up for your PADI Open Water Diver course, contact us at info@roatandiver.com and get started on your scuba certification course today!
5 Easy Ways to Improve your Buoyancy
Good buoyancy is one of the most important components of being a good diver. If you're flopping all over the place, crawling on the coral and landing on top of other divers, you are not being a good diver or a good buddy.
Good buoyancy is one of the most important components of being a good diver. If you're flopping all over the place, crawling on the coral and landing on top of other divers, you are not being a good diver or a good buddy.
Fortunately, buoyancy is an easy thing to improve with just a few simple steps! Let's discuss our 5 Easy Ways to Improve your Buoyancy, shall we?

Check out Roatan Divers' instructor, Eri, demonstrating her mad buoyancy skills!
Tip 1. Take a buoyancy course
You heard this in our piece on improving your air consumption. Good buoyancy can improve so many things, including air consumption, kicking and how kind you are to the reef and your fellow divers, so kill a flock of birds with one stone by taking a buoyancy course.
Though it may not sound terribly exciting, a buoyancy course is, in my humble opinion, the greatest thing you can do for your scuba diving. You'll find out how many weights you need to achieve neutral buoyancy, learn how to dive well when you're both under- and over-weighted and practice using your lungs to adjust your buoyancy. Throw in different obstacle courses to make it extra fun and challenging, and you've got yourself an experience that will benefit you for the rest of your scuba diving career.
Tip 2. Log your weights every time
Whenever we are kitting people up, one of the questions we ask is "how many weights do you need?". You would not believe how many people walk through our doors and don't actually know, and can't even ballpark, how many weights they need. As dive professionals, we can eyeball your weights fairly accurately 85% of the time, but some people require more weights than it seems and some require less. We then spend the first few dives trying to sort out your weights, and your air consumption, buoyancy and experience inevitably suffer a little for it.
To avoid the breaking in period every time you go on a dive holiday, you should log how many weights you used on each dive every single time. That way, when you show up somewhere new, you can have an idea of how many weights you need. Even if the equipment or environment is different (fresh vs salt water, 3mm shortie vs 5mm long wetsuit), if you know how many weights you used previously, you can calculate accordingly. Scuba diving very overweighted or underweighted can make your diving a lot harder and you'll blow through your air faster. If you can start your dive trip properly weighted, and all it takes it writing a few numbers in your logbook, why not do it?
Tip 3. Focus on your kicking style
Scuba diving should basically be a practice of hovering with the odd kick here or there. You could be well streamlined and properly weighted, but if you are kicking poorly, then you are cancelling out everything else. Keep your body horizontal and kick from your hips, or you can frog kick if you're feeling comfortable. Bicycle kicking, which is where you are upright and kick from your knees like you're riding a bicycle, will only kick you up towards the surface and throw your buoyancy off balance. You'll also end up kicking up the coral or sand and become the reef's and your dive group's Enemy #1, so it's to everyone's benefit if you kick properly.
Tip 4. Look ma, no hands!
Part of efficient movement underwater also involves not using your hands. Using your hands will tire you out and you run the very real risking of hitting someone in the face or breaking off some coral. There's a reason that we say you shouldn't touch coral. Yes, it's for the coral's benefit because it's very fragile and you can damage it, but it's also to protect you as well. Coral is sharp, and whatever coral cuts you have will get infected. Focus on keeping your arms clasped in of you or by your side.
One of our former instructors used to have all of his Open Water students hold their arms out in front of them in a Superman pose. This kept them aware of their arms, and it also naturally forced their bodies into a horizontal position. This was a great way to practice good kicking and hand placement until they were comfortable enough to find their own rhythm and preferences.
Tip 5. Don't be afraid to take advice
No one goes into scuba diving wanting to be a bad diver, right? But like all activities, there are some things that you'll be great at first try and some that will take work. Don't be afraid to ask for, or take advice from, more experienced divers and dive professionals. Of course, if someone is being nosy or rude, then you can tell them to butt out, but if someone offers you sane, comprehensive advice that is going to help your buoyancy or your scuba diving, then it's okay to take it. We all need advice sometimes, and it's better to take the advice and become a better diver than to believe that you're above that and never improve. As with everything in life, you can always get better, and you should always strive to do so. Life was meant for learning and growing!
And there it is, our 5 Easy Ways to Improve your Buoyancy! We hope you have an easy, breezy dive filled with wonderful schools of fish and abundant coral. Happy diving!
5 Smart Ways to Improve your Air Consumption
Good air consumption can open up your world when it comes to scuba diving, so let's discuss 5 smart ways to improve your air consumption.
You're 40 minutes into the most amazing dive in the world, surrounded by beautiful schools of fish and vibrant soft coral moving gently in the currently, when an enormous eagle ray comes gently floating by. You want to stay in this moment forever when...curse! You're at 700 psi. It's time to start your safety stop and end the dive.

Want to avoid these types of scenarios? Good air consumption can open up your world when it comes to scuba diving, so let's discuss 5 smart ways to improve your air consumption.
Instructor Eri demonstrating great buoyancy control.
Tip 1. Take a buoyancy course
Good buoyancy is the key to good air consumption. There are three main benefits of being weighted well and demonstrating good buoyancy: you don't waste a lot of air inflating and deflating your BCD, your breathing is more regulated and you use less energy.
Whenever we have Advanced Open Water Diver students, the first dive of the course that we always strongly recommend they complete is the Peak Performance Buoyancy dive. You learn how to weight yourself properly, how to swim in a good, efficient manner and how to use your lungs, not your BCD, to control your buoyancy. It's a really beneficial dive that improves people's diving for their entire diving careers, so it's a dive that should definitely not be missed.
Want to take it even further? Take an entire buoyancy specialty course, where you spend several dives focusing just on buoyancy. This will greatly improve your diving and your air consumption in the long run.
Tip 2. Be a yogi (or at least breathe like one)
A lot of people find that doing yoga benefits them as scuba divers. Even if you don't do yoga, it doesn't hurt to breathe like someone that does. Yoga breathing is very similar to how you should breathe in scuba diving. Nice, long deep breaths in and nice, long deep breaths out.
Breathing deeply not only improves your air consumption, but it improves your buoyancy control as well. Your lungs act as a secondary buoyancy control device, so breathing shallowly and holding air in your lugs will make you more positively buoyant. If you are positively buoyant on a dive, especially during your safety stop, it can stress you out and make you breathe even more shallow, further increasing your buoyancy. Breathing your air out deeply will help neutralize your buoyancy, so you get the double benefit of better air consumption, buoyancy control and less stress when you breathe deeply.
Tip 3. To take it further, try the 1:2 rule
When I first started diving, I wanted to see just how good I could get my air consumption, so I started a 1:2 rule to see if it made a difference. Breathe in for a certain number of seconds (4 seconds was comfortable for me) and breathe out for twice that period of time (8 seconds out). While it wasn't a type of breathing I would naturally do, focusing so much on my breathing and taking the time to not only breathe in slowly, but to also breathe out slowly, made a difference for my air consumption. Now, I can actually get two 60 minutes dives off of one tank if I am so inclined (I'm not normally so inclined, but it's had its benefits before).
Tip 4. Be efficient
Efficiency is the name of the game in scuba diving. Efficient kicking is important to decrease your energy consumption and breathing. When you're diving, you basically want to be hovering always with a gently kick or two every once in a while. Try not to use your arms as that will increase your energy consumption, and though you may not notice it, your breathing will increase as well. Watching your guide or instructor as they dive and see if they're being efficient. If they are, try to mimic them and see how it suits you! If they're flip-floppiting everywhere, then use them as your example of what not to do.
Tip 5. Be gentle with yourself
Being a good diver does not always come naturally to everyone. Some people are great divers on their first Discover Scuba Diving program. Some people require dozens of dives and lots of additional training before they become good, comfortable divers. Everyone is different. If your air consumption is faster than the others, that's okay. With time and some practice, your air consumption will improve, so give yourself a break and just enjoy yourself. The more stressed you are, the more you will breathe, so just relax and enjoy your dive!
So there you have it, 5 smart ways to improve your air consumption! Remember, the most important part of your scuba diving experience is to be mindful, smart, and most of all, have fun. Everything else will come in time, so enjoy the beautiful underwater world and you'll get a 60 minute dive before you know it!